Today felt like a
tutorial day! Here is a little tutorial for a little square of mine. I know, my pattern name skills need some work....
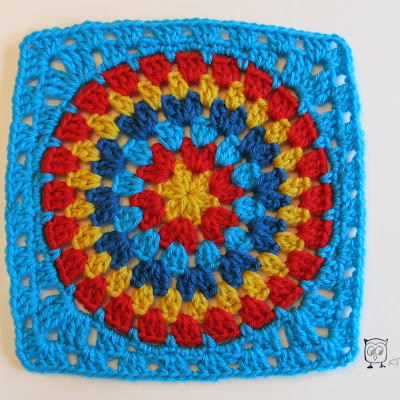
This square is very simple, and if you've tried Squaring the Big Circle, you will recognize the first three rounds. Here are two examples of things I've made using it:
On this one, I finished the squares with a round of single crochet, and then whipstitched the squares together.
This one is still a WIP, but I used the join-as-you-go method, and used one color for the first three rounds, and black for the fourth round.
By changing just one aspect, you can see how it can change the whole look.
So onto the Little Circle Square tutorial!
Worsted weight yarn (I used Vanna's Choice)
Size J hook
Written in US stitch terms
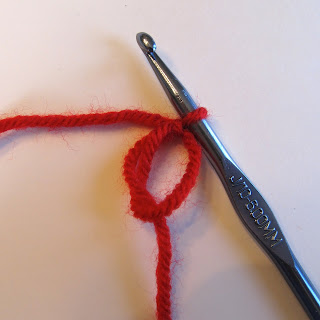 |
| Start with a magic ring (or join a few chains into a loop if you prefer) |
 |
| Rnd 1- ch 3 (counts as 1dc), 1dc, ch 1, [2dc, ch 1] 5 times, join with sl st in top of ch 3, fasten off (You should have six groups of 2dc with ch 1 spaces in between.) |
 |
| (I like to start my rounds with a standing stitch. Yarn over, insert hook into any ch 1 space, and complete dc as usual.) |
 |
| Rnd 2- In each ch 1 space [2dc, ch 1, 2dc, ch 1], join with sl st in first dc, fasten off |
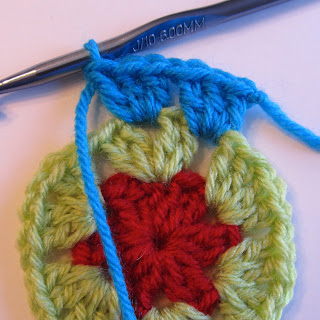 |
| Rnd 3- In each ch 1 space [3dc, ch 1], join with sl st in first dc, fasten off |
 |
| Rnd 4- In any ch 1 space *[3dc, ch 1], in next ch 1 space [3dc, ch1], in next ch 1 space [3tc, ch 2, 3tc, ch 1] (making a corner), in next ch 1 space repeat from * around, join with sl st in first dc, fasten off |
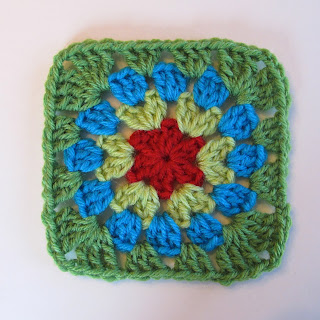 |
| Your Little Circle Square is complete! |
Need some ideas for joining?
 |
| Sew them together (this was done with right side of squares facing each other, and whipstitching in back loops) |
 |
| I like making the whipstitch with a noticeable color which I think makes for a fun design element. |
 |
| Single crochet the squares together (with wrong sides of squares facing each other, single crochet through back loops) |
 |
| Or with another color, single crochet a border on each square, and then whipstitch the squares together (sc in each st and ch 1 space, and I did 4sc in each corner) |
If you have any questions, I'd love to help, and if you try this tutorial I'd love to see what you make!


Both those squares are gorgeous, and from someone who just can't read patterns, I think I actually understood yours!!!!
ReplyDeleteIt was really clear, so thanks
Another great tutorial. You always do such a nice job with these.
ReplyDeleteAwesome work...very much helpful..
ReplyDeleteGreat tutorial, well done :-)
ReplyDeleteThis square is so versatile, and for that, I have given you the Versatile Blogger Award! :D Check it out at http://acreativebeing.com!
ReplyDeletexo,
wink
Lovely pattern, thank you for sharing :)
ReplyDeleteYour blankets look amazing by the way... so cheerful!!
Louise xx
Oh so lovely of you to share this.
ReplyDeleteAm bookmarking now!!
I have a granny square blanket inside me, I know it!
Xx
Hi there, thanks for this tutorial...I love it and its easy to follow. I am trying to make your blanket (the white bordered one) and just got home with the yarn today! I've done the first 3 rounds from your tutorial but need to make my circle bigger before squaring it off...would you mind give the instructions for the rest of the rounds (4,5,6) before I then square it off? I will happily share photos of what I'm able to achieve. Thanks, Corinne
ReplyDeletewww.ffhfarm.wordpress.com
This square is so cute! I made it today and blogged about it on my Granny Challenge with a link back to you! http://sittingatourkitchentable.blogspot.com/2011/09/little-circle-square-granny.html
ReplyDeleteHave a great evening!
Amy
Thanks for the tutorial! I'm thinking of making a blanket for my bedroom, and I'm going to use this square. Love it! When I blog about it I will send a linky over to you. Have a great week!
ReplyDeleteThank you so much for posting this! I've never done any granny squares or motifs before, but they all look so cute I wanted to try. (I'm also trying to learn how to read patterns.) I'm so new at this, it took me a couple tries, but I love your photos and instructions! Thanks again!
ReplyDeleteThank you so much for this great post! I am a visual crochet person. Can't read patterns and follow very well, Just looking or watching seems to make more sense to me!
ReplyDeleteBlessings,
Susie
This Tutorial is great. I'm currently using to make a rainbow baby blanket.
ReplyDeleteThank you for posting this photo tutorial. This is new to me and you helped me to understand with your pictures and instructions. Now I can do it.
ReplyDeleteYou're welcome!! :}
DeleteI can't wait to use this. Your tutorial was great. I love the pictures and your color selection. I plan to make a blanket or prayer shawl. :)
ReplyDeleteThanks! Hope you enjoy making it, and I'd love to see what you make!
DeleteThank you for this very clearly explained tutorial and the helpful joining methods. I am going to try it out today! I've already chosen the yarns I want to use!
ReplyDeleteThis comment has been removed by the author.
ReplyDeleteWhere can I just the written instructions? I may be overlooking the link but I have failed. I love this design. Thanks
ReplyDeleteHi Sheila,
DeleteThere are no separate written instructions, just the photo tutorial. However, if you'd like to email me your email, I could try to put it in a more formal written style for you, and then you could just print out the email.
I'd be happy to help,
Kate :}
Thank you very much for this tutorial, I did it and it was easy and the final result was awsome!!
ReplyDeleteOh I'm so glad!! You're welcome!!
DeleteKate :}
Hello! I just found this on pinterest and I'm definitely going to try it. Your instructions seem very easy to understand. Thanks so much for sharing. --Sierra
ReplyDeleteGreat, you are so welcome! If you run into any problems, just let me know!!
DeleteKate :}
Could you tell me the finished size of the square? I'm looking for a 6" square and really love this design. Thanks in advance!
ReplyDeleteHi Holly! I don't believe this square is 6 inches, but you could always add rows of three double crochets to help get to the size you want! And if it needs just a tiny bit more, you could do a border of single crochet.
DeleteWhen designing squares I'm not thinking about it's final size, which is something I should keep in mind for future! In my tutorials, my "Granny Arrows" square could maybe be worked until it gets to a desired size...
I hope this helps! My suggestion is to experiment, or search on Ravelry for patterns that are specifically 6 inches.
Good luck and happy crocheting!
Kate :}
I can't believe how FAST these work up. I'm only doing 4 rounds with the last being the border. Thanks so much for your pattern. I looked for days for one.
ReplyDelete