This is going to be my first attempt at writing up one of my own designs. Because there has been a little more interest in the first blanket I made from this pattern, (and the fact that I was so happy with how it turned out), I thought it would be a great excuse to attempt a written pattern/tutorial to share!
I think this square (like most crocheted squares) has limitless potential, so I see this as more of a guideline than an exact pattern. Once you get the basic pattern down you can play with colors and joining methods. For example, for the first blanket I made, every circle had a white background and I used the
join-as-you-go method that I learned from Sarah London. For the blanket that I'm working on now, I'm making different colored backgrounds and plan on adding a row of single crochet in white on the last round and then sewing the squares together.
Ok, on to the pattern!
Worsted weight yarn (I used Vanna's Choice)
Size J hook
Written in US stitch terms
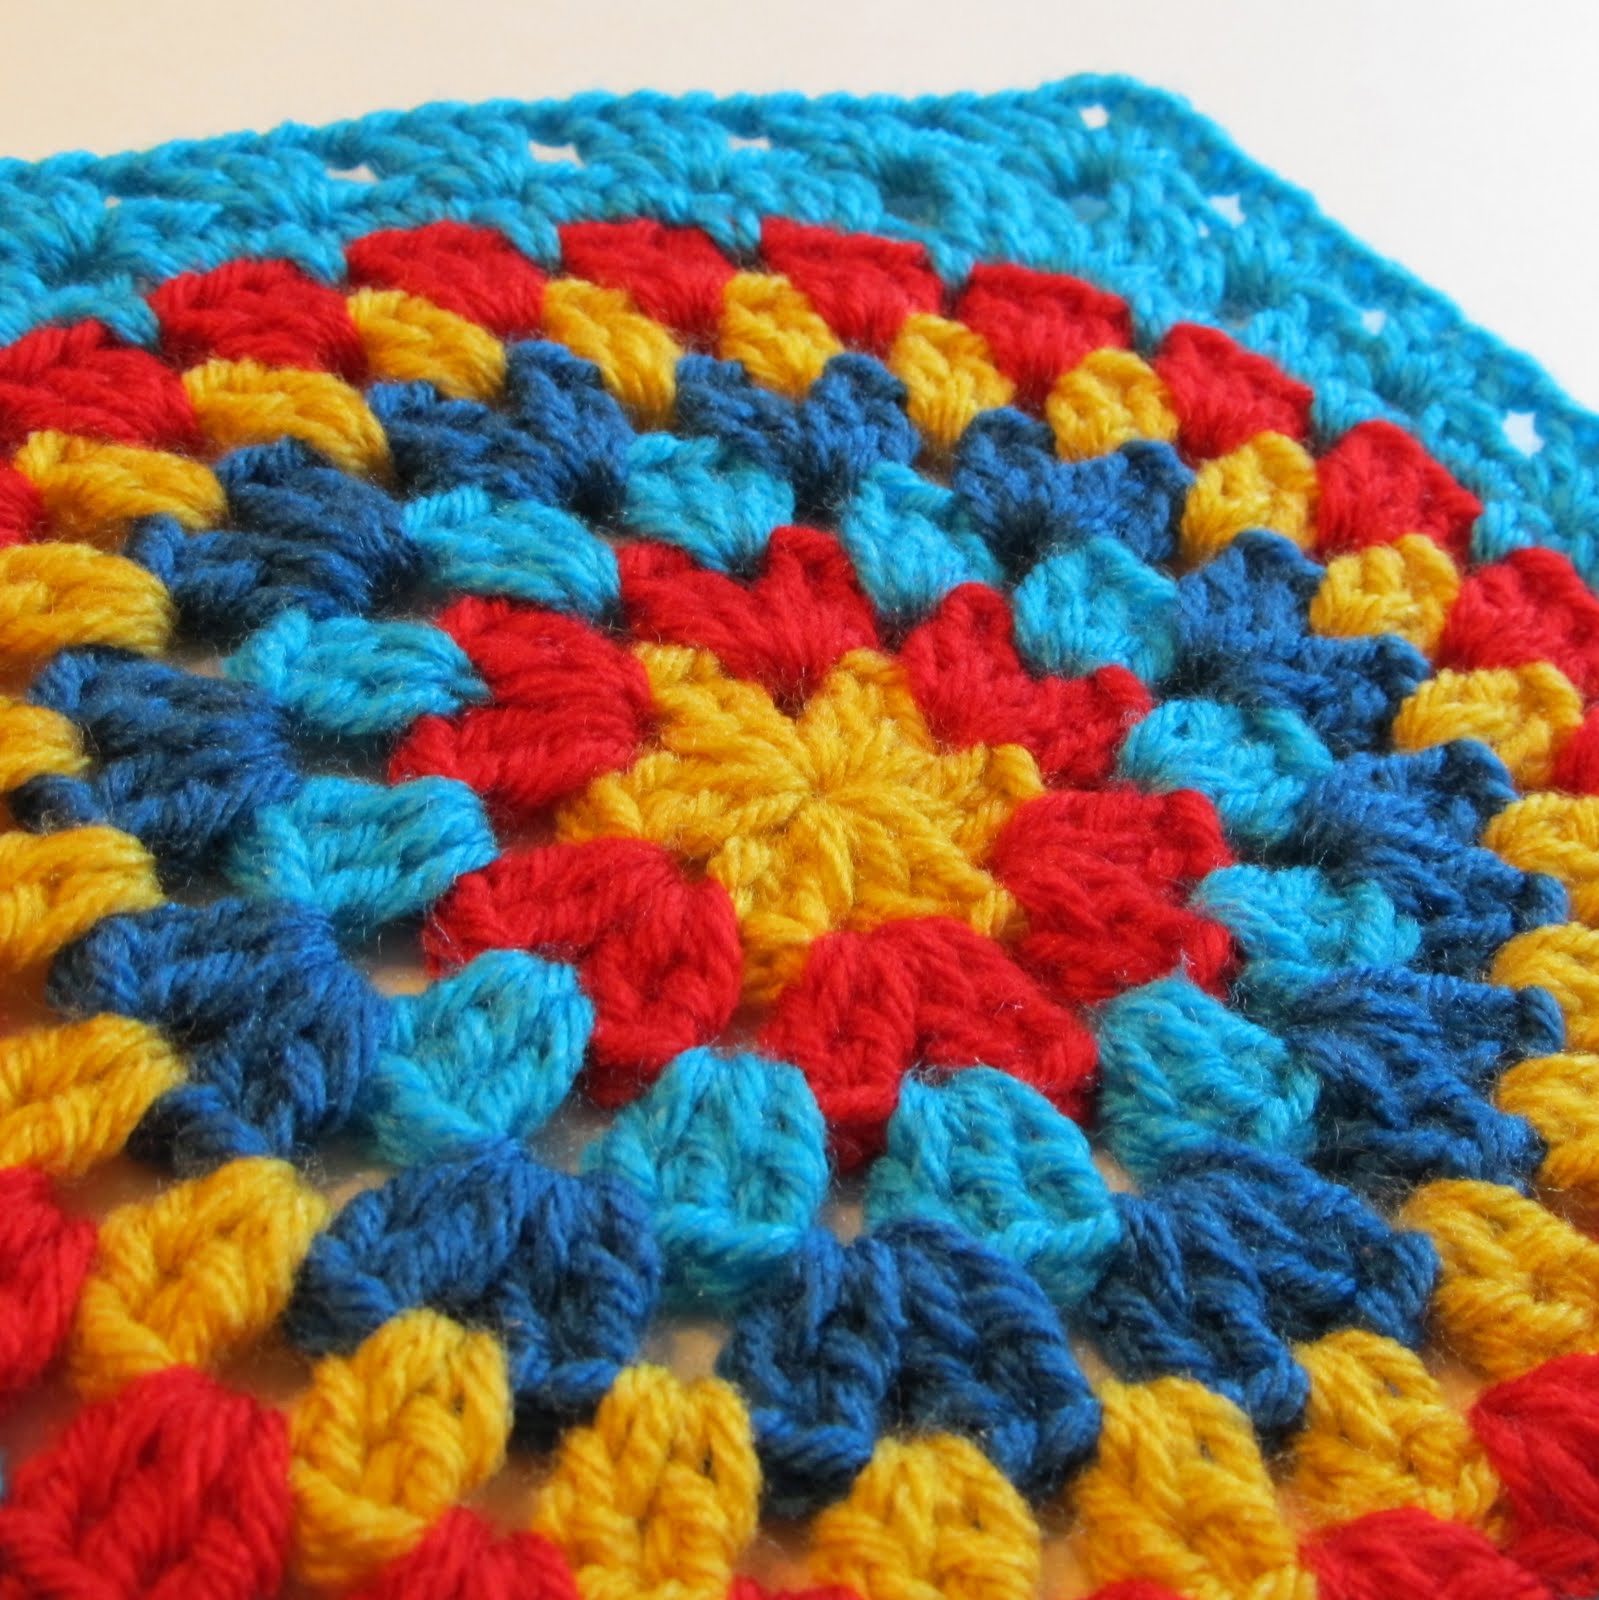
 |
| Start with a magic ring (or join a few chains into a loop if you prefer) |
 |
| Rnd 1- ch 3 (counts as 1 dc), 1 dc, ch 1, [2 dc, ch1] 5 times, join with sl st in top of ch 3, fasten off |
 |
| You should have 6 groups of 2 dc with ch 1 spaces in between. |
 |
| (I like to start most of my rounds with a standing stitch. Yarn over, insert hook into any ch 1 space, and complete dc as normal.) |
 |
| Rnd 2- In each ch 1 space [2 dc, ch 1, 2 dc, ch 1], join with sl st in first dc, fasten off |
 |
| Rnd 3- In each ch 1 space [3 dc, ch1], join with sl st in first dc, fasten off |
 |
| Rnd 4- In each ch 1 space [2 dc, ch 1, 2 dc, ch1], join with sl st in first dc, fasten off |
 |
| Rnd 5- In each ch 1 space [2 dc, ch1], join with sl st in first dc, fasten off |
 |
| Rnd 6- In each ch 1 space [3 dc, ch 1], join with sl st in first dc, fasten off |
 |
| Rnd 7- In each ch 1 space [1 sc, ch 3], join with a sl st in first sc, don't fasten off |
 |
| Rnd 8- Sl st into ch 3 space, ch 1, 3 sc, ch1... |
 |
| * in next ch 3 space, [2 sc, 1 hdc, ch 1]... |
 |
| in next ch 3 space, [1 hdc, 2 dc, ch 1]... |
 |
| in next ch 3 space, [3 tr, ch 2, 3 tr, ch 1]... (corner made) |
 |
| in next ch 3 space, [2 dc, 1 hdc, ch 1]... |
 |
| in next ch 3 space, [1 hdc, 2 sc, ch1]... |
 |
| in next ch 3 space, [3 sc, ch 1]... |
|
| repeat from *(second picture of Rnd 8) around, join with sl st in first sc, don't fasten off |
 |
| Rnd 9- sl st in next two sc, sl st in next ch 1 space... |
 |
| ch 3, 2 dc, ch 1 |
 |
| in each ch 1 space [3 dc, ch 1], and in corner spaces [3 dc, ch 2, 3 dc, ch 1]... sl st in first dc, fasten off!! |
 |
| And you're done! |
If you have any questions or find any mistakes please let me know, and if you make a square/blanket from this pattern I would love to see it!
**COMMENTS ARE FULL - Any questions/comments please feel free to email me! signedwithanowl@gmail.com


Thanks so much for writing this up! I made an attempt at squaring a large circle a month or so ago with mixed results.
ReplyDeletegreat tutorial! I think I will use these to make a market bag. Thanks!
ReplyDeleteExcellent tutorial, Kate! Thanks so much for sharing your pattern with the world!
ReplyDeleteOH, I so love this pattern. I'm four sqaures in with 76 to go for my 80 circle 80th birthday present for my Dad. I see that you are new to blogging. It's so much fun. Not sure if you are going to open up to followers, but I would love to follow you here. I live more in the blog world than over on Rav. Hope's it's OK in my next posting that I link other yarnie blog friends back to this posting. You can pop by today's posting and the last picture is of the colors I'm using for this pattern.
ReplyDeletewww.thegardenbell.blogspot.com
You are off to a fabulous start here,
Thanks again,
Kate - The G.B.
I just tried to see your blog - but was 'denied' because I wasn't 'invited'!
DeleteHow does one get invited? - becoming more and more avid crocheter since back problems have sidelined me from more active pursuits....
wish I could take a look...there weren't any hints there as to how I could be "invited" to join....
I just tried to see your blog also and was denied.
DeleteSame with me.
DeleteDear Kate,
ReplyDeletethank you so much for this great tutorial!
I love this pattern so much and you do a great job. Your Blog is beautiful and i am now a follower of your Blog and your wonderful work...
I wish you a wonderful and funny Weekend and send you many, many Greetings and again "Thank you"!!!
Marion
Just found you from Kate. Welcome to blogging. I think I could actually learn how to do this. Hope to see you back at my place tonight for the newbie party. You will love it.
ReplyDeleteI'm popping over from The Garden Bell to say hi! You sure make the rounds look easy. I have never mastered the granny square. All that increasing makes me crazy. I tried a dishcloth in the rounds the other evening and it took forever. I couldn't remember which row I was on and when I needed to increase. :/ I will give this a go! Thanks for sharing. Best wishes, Tammy
ReplyDeleteI'm also visiting at the suggestion of Kate at The Garden Bell. That's a great tute! I'll have to try that someday.. right now I'm trying to slog through making lots of Japanese Flowers for a shawl. Feel free to visit my blog and would love to have you follow me - I'm a new follower of yours! :-)
ReplyDeleteTeresa in Oregon
Welcome to Blogging! You will love it just like my blogging friends Kate and Pammy Sue. Your photos are wonderful and I can't believe you are doing a tutorial already!
ReplyDeleteHugs,
Sandy
Hey! Great start. Love your blog , so far! Ros
ReplyDeleteThis is a great tutorial. Don't be surprised if I end up highlighting it for The Heart in Hand Project. ~Kelly
ReplyDeleteunDeniably Domestic
The Heart in Hand Project
I have just found your blog via 'the garden bell' and i think your blog is just peachy, i shall be following you.
ReplyDeleteExcellent granny square by the way..
Pixie :)
Hi Kate, found you through The Garden Bell. Lovely tutorial and great blog. Welcome to blog world we are so happy to have you.
ReplyDeleteMeredith
Hello Kate :-) I just had to come over and visit as you are also an owl girl! Love the tutorial and welcome to blogland...its very addictive but great fun and lots of great friends Jenni :-)
ReplyDeletethank you so much for this great tutorial!!!
ReplyDeleteThanks for sharing this great pattern! I just made it for my granny-a-day project! :)
ReplyDeleteThank you! I LOVE this block. Like Adaiha, I also just made it for my Granny-A-Day after seeing it on her blog. Adore!
ReplyDeleteI'll try it!
ReplyDeleteI, too, just found you from The Garden Bell. Love this pattern AND your succinctly written tutorial. Very easy to follow. I shall be putting it into action very soon! Thanks much! Annette
ReplyDeleteAnd a P.S. - Just saw the sign you made for your craft fair (on my way to this tut). How adorable is that? Very clever!
ReplyDeleteThanks so much for writing this up! I made an attempt of....great tutorial....thanx a lot...
ReplyDeleteI´m learning to do grannys-square and your tutorial about big circle is helpful fo me. Thanks.
ReplyDeleteI stay here.
Muchas graqcxias por este tutotial es de gran ayuda un beso desde Argentina ♥ te sigo!!!
ReplyDeleteOne of the best tutorials I have scene. Thanks for a good job.....can't wait to try the block.
ReplyDeleteYou're a natural when it comes to writing patterns. Very easy to understand and not a single mistake. One square down... 79 to go.
ReplyDeleteThank you very much for sharing!
Thanks for posting this great square! I made 3 for Nerd Wars and will be donating them to the Pine Street Inn Blanket project.
ReplyDeleteI'm also in the process of making a hexagon quilt for my daughter that's proving to be a PITA to join so she might just be getting circles instead :)))
beedragon
I followed a link on Pat Sloan's blog and I am in lovewith your squared circles. I am going into my closet for some yarn and a hook and try it out. I love theone you did with all the white background. I have to do that one. Can't wait to see the next one.
ReplyDeleteGreat blog! Thanks for the tutorial
thank you soooo much i have been hunting for this for so long !
ReplyDeletewhat a blessing for those of us who love to crochet but need a visual to help us learn. Your blanket is WONDERFUL! Thanks for sharing.
ReplyDeleteThis is a beautiful pattern, and I love your tutorial. Very clear to understand and follow. The best I have run across ever, and the photos are great. Thank you very much for sharing your creativity. Hard to believe this is your first. I haven't made it yet to any of your other pages, but when I have more time, I will be back. I can'r wait to see more.
ReplyDeleteWhat a great design! I have all the tools to crochet but I quilt instead. One day! Thank you for sharing.
ReplyDeleteThanks so much for writing this up!!!!!!!
ReplyDeleteI just found this last night, and have already started making an afghan. Thanks for sharing this. It is beautiful!!!!
ReplyDeleteMuy hemoso y la explicaciones excelentes GRACIAS
ReplyDeleteThank you so much ! your instructions are so clear Ive just made two !! after many attempts trying to square a circle Ive finally done it !! thank you !
ReplyDeleteI'm going to start making these! This is wonderful! Thanks so much! I've been looking for something different and this fits the bill!
ReplyDeleteThank you for this great patron and your great tutorial. I love it and I am going to try to make a messengerbag, using this patron! Greetings from Holland.
ReplyDeleteGreat!! I'd love to see it when you're done! :)
DeleteWhere can we find the written instructions w/o the pictures? Thanks
ReplyDeleteHi sheila,
DeleteIf you would like the written without the pictures, I could email you the instructions, and then you could print out your email.
If that works for you, just email me your email address! signedwithanowl@gmail.com
Kate :}
I would love to have the written instructions :)
Deleteladybuggcreations@yahoo.com
Hi,
DeleteThis square looks awesome.
I would like the written instructions also.
Thanks,
lynnebutterfield@yahoo.com
Me too.....tweetums007@verizon.net
DeleteI love this pattern. So easy and fast. Thank you. Linda
ReplyDeleteGreat! You are welcome!
DeleteKate :}
Can't wait to try this pattern. Thanks for sharing.
ReplyDeleteYou are very welcome! If you run into any problems, let me know!
DeleteKate :}
Hoola Kate! que gran tutorial! y que colores mas maravillosos, super bonitos!
ReplyDeleteabrazos y gracias por compartirlo
A picture really IS worth a thousand words, and your tutorial is PERFECT. Your step by step pictures with descriptions makes crocheting what it's supposed to be... enjoyable and FUN! Thank you!
ReplyDeleteYou are so welcome, and thank YOU very much!! It's so nice to hear that this tutorial has been helpful and that people are having fun with it! It really makes my day!
DeleteI LOVE this!! Thank you so much for making a tutorial!
ReplyDeleteYou are very welcome! So glad you like it!
DeleteKate :}
I love this pattern! I am using it to make a pattern as a gift. However, I have found that on Round 8 you need to include the 3 sc around the 7th round 3 ch. i hope this helps someone else!
ReplyDeleteI love this pattern too. The tutorial is JUST PERFECT!!!
ReplyDeletethank you very much. I'll start mine tomorrow morning.
I'm new at crocheting but I'm totally engaged to it.
Greetings from Spain
Thanks for this idiot proof tutorial. I love the design!
ReplyDeleteLove the pattern. Have lots of scraps and this would be a great way to use them. Would like to get the pattern without the pics. Jane
ReplyDeleteGreat square, fantastic tutorial! I linked to this page on my blog this morning! :) http://www.mooglyblog.com/2012/08/20/10-more-perfect-crochet-squares-for-afghans/ if you want to check it out.
ReplyDeleteThank you!! I'm so flattered!
DeleteKate :}
Un motivo con colores muy alegres, y el tutorial está muy claro, las imágenes son perfectas.
ReplyDeleteVoy a incluirlo para mi próxima manta la cual quiero comenzar deinmediato.
Gracias por compartir
Gracias! De nada!!
DeleteKate :}
Thank you for this found the site though reverly
ReplyDeleteYou are very welcome, if you run into any questions just ask!
DeleteKate :}
Thank you for this toturial! I made one blanket with this granny and the result is incredible!! I follow your blog because is very interesting and I improve my crochet (My english is very bad... sorry...)
ReplyDeleteIf you want see my blanket is here
http://cuchiflitinaysuslocuras.blogspot.com.es/
I enjoy very much macking this blanket thanks so much!!
You're welcome!! I'm so glad you liked the tutorial! Your blanket looks great, thanks for sharing it!!
DeleteHave a great day!
Kate :}
De nada!!
ReplyDeleteKate :}
Thank u for posting on Pinterest. I cant follow written instructions but can follow pictures since I taught myself. Great use of colours and easy to follow pics!!
ReplyDeleteYou're very welcome, although I can't take credit for posting on Pinterest myself, but lots of other people have posted this tutorial which has resulted in a lot of traffic to my blog! I should be thanking them!! I'm so glad you found the pictures easy to follow!
DeleteKate :}
Thanks. Great job. i made the square.
ReplyDeleteYou're welcome!
DeleteWonderful pattern! Could you please send me just the written instructions via email? Thank you so much
ReplyDeleteMattiegleason@hotmail.com
Beautiful! Could I also have the written instructions via email? lambchop34@comcast.net
ReplyDeleteHow much of each color yarn is needed?
love this pattern making one for my niece...I know she will love it...making it in all colors...
ReplyDeleteGreat, I'm glad you like it!! I'd love to see it when you're done!
DeleteKate :}
sono bellissimi!
ReplyDeleteGrazie!
DeleteMuy buen tutorial, y me alegro de haber encontrado este blog. Saludos desde Buenos Aires.
ReplyDeleteHola y gracias!!
DeleteThank you for the this beautiful granny square.
ReplyDeleteI love this square but I was wondering to make it one big afghan could I just repeat rounds 3-5 until the end and the do rounds 7-9?
ReplyDeleteI am the one who asked about make a large afghan by just repeating rounds 3-5.
ReplyDeleteHi Juanita,
DeleteI'm afraid that once your circle is really big, that it will be difficult to "square." I don't know as if the treble crochets that make the corners would reach the circle and create the square shape.
You could always repeat the last round and just keep adding rounds of 3 dc, like a big granny square.
I hope this helps! And if you try something different, I'd be interested to hear!
Kate :}
This is great! So many color combinations! I am in South Africa and we have a group here called Knit-A-Square. We make 8x8 squares and then put them together to make blankets for orphan children. Plain squares get soooo boring after a while! Please know that your pattern will be part of many blankets that are going to keep dozens of children warm this winter.
ReplyDeleteThanks for your time and effort!
Stephanie
Hearing this really makes my day!!! You are so welcome, and your charity sounds fantastic! Thank YOU for your time and effort!!
DeleteKate :}
Even before I started reading the directions, as soon as I saw the first picture, I thought of join as you go. I do a lot of projects, many of which go to charity organizations, using this method and it is great. Glad you are using it also.
ReplyDeleteWill definitely be using your pattern.
Thanks for sharing it.
Great, you're welcome! I definitely like the sound of "charity!"
DeleteKate :}
Thanks for sharing this tutorial with us, looking forward to making up a blanket or a pillow or......the possibilities are endless.
ReplyDeleteYou're welcome!! Hope you enjoy it, and let me know if you have any questions!
DeleteHappy crocheting!
Kate :}
this is the first project that iam trying since learning how to crochet last week. it is amazing, i cant tell you how many people come and ooh and ahh over what im working on. thank you for a easy to understand and likewise beautiful pattern.
ReplyDeleteYou are so welcome, and you don't know how happy this makes me!! I'm so glad you're enjoying it for a first project!!
DeleteHappy crocheting!
Kate :}
I love it! Your instructions are precise and clear. I had no problem what so ever. Thank you so much for making this!!
ReplyDeleteThank you and you are so welcome! I'm so glad you didn't have a problem following the pattern!
DeleteKate :}
I think the fact that you are not an "experienced" tutorial writer was in your favor. You took the time and effort to take VERY detailed pictures and explain the stitches for EACH step. VERY thorough! This is a blessing for those who may not be able to look at a stitch and figure it out... kudos to you. Keep writing tuts just this way! I'm a happy camper on this tut!
ReplyDeleteThank you so much!! I'm so glad that people are finding this tutorial helpful!
DeleteKate :}
Beautiful!! Thanky you!
ReplyDeleteYou're very welcome!
DeleteHappy crocheting!
Kate :}
Fantastic. Very clear and so colorful. Going to try it tonight, I'm doing bunting at the moment so a change of shape will be great.
ReplyDeleteAnnette
Great! If you run into any trouble, just let me know!
DeleteHappy crocheting!
Kate :}
Great pattern and clear instructions for a beginner like myself. Question- how could one extend the circular instructions and continue with more and more rows to creat a large or medium size afghan? Thanks for any advice .
ReplyDeleteAlice from California
Hi Alice,
DeleteThanks for the kind words about the pattern! I'm afraid that if the circle was larger, you wouldn't be able to "square" it for a larger afghan. You could just repeat the last row of 3dc's to make a larger square, but I don't think that's the look you're looking for. But maybe someday I'll come up with a way to make a larger one?
I wish I was more help!
Kate :}
Oh. My. God!! This is perfect! I've made two dish clothes using this pattern! Thank-you!!
ReplyDeleteOh I'm so glad!! You're very welcome! Hope they keep your dishes clean :)
DeleteKate :}
just love this pattern Thank you so much for the great tutorial.
ReplyDeleteCould you please email me the written instructions also.
dhomespun@comcast.net
Thanks very much for this brilliant pattern. I've just made myself a lovely cushion cover and I'm delighted with it.
ReplyDeleteI'd like to use the circle part of the pattern to make a circle cushion cover (not square it off). Would this work by repeating rounds 3-5?
I know previous poster have asked similar questions but I think they have always in the context if squaring.
You're welcome!! Based on a similar pattern I've used, you could try:
Deleteround 7- (3 dc, ch 1) in each ch. 1 space
round 8- (2 dc, ch 1, 2 dc, ch1) in each ch 1 space
round 9- (2 dc, ch 1) in each ch 1 space
round 10- (2 dc, ch 1) in each ch 1 space
round 11- (3 dc, ch 1) in each ch 1 space
Hope this helps!
Kate :}
im using rounds 1 and 2 to make a blanket for my sister in law and so far i love how just those two rounds look and how its comming along ty for publishing this pattern!
ReplyDeleteThat's so great! You're very welcome, and I'm glad you like it!
DeleteKate :}
Kate,
ReplyDeleteThanks for the great design! My mom and I have both made squares (my mom is making a baby afghan and I am making a big afghan). We love how you put your pieces together. Can you tell us how you did it please? It looks different than how we have put pieces together in the past, and we love it.
Thanks,
Sara
jsarajo@gmail.com
What a fab tutorial with clear instructions and photos. Just made my first circle in a square! I'm making a cotton afghan in super spring colours using three different blocks.Looking good........ :-)
ReplyDeleteThanks, I'm so glad you like it!! I'd love to see your spring afghan when you're done, sounds fantastic!!
DeleteHappy crocheting!
Kate :}
Hi, I would really like to have a go at this crochet square but I have never learnt the short hand that so many people use in instructions, is there any chance of a small glossary for the dc, ch, etc?
ReplyDeleteHi Ashlea, hope this helps! (I use US terms)
Deletesl st- slip stitch
ch- chain
sc- single crochet
hdc- half double crochet
dc- double crochet
Let me know if you still find anything confusing!
Happy crocheting!
Kate :}
tr- treble crochet!
DeleteHow could I make it smaller? I used a size I hook for my first one and it came out Eight Inches and an H hook for my second and it came out the same size. i want it an inch smaller.
ReplyDeleteHi Candi, I'm not sure how to help. Perhaps trying a smaller weight yarn with a smaller hook?
DeleteOr maybe you could use my Little Circle Square Tutorial and just add several rounds of (3dc, ch1) in each ch1 space and (3dc, ch2, 3dc) in each corner, until you get to the desired inches. http://signedwithanowl.blogspot.com/2011/09/little-circle-square-tutorial.html
Hope this helps!
Kate :}
Hi Kate
ReplyDeleteIs this tutorial using UK or US stitch terms?
Many thanks
Verity
Hi Verity,
DeleteIt's in US terms! Thank you for reminding me, I've been meaning to add that to my patterns!!!
Kate :}
Sorry Kate. I've just read a previous post which answers my question about US terms! doh.
ReplyDeleteNo, it's fine!! I've added that it's in US terms, and I need to remember this in the future! So thank you!
DeleteHappy crocheting, and if you run into any trouble, just let me know!
Kate :}
Hi Kate! I have just finished one square and really happy with it. Thanks for this wonderfull pattern.
ReplyDeleteArchana.
You're welcome!! It makes me so happy to hear that you like it!!
DeleteKate :}
I love love love this granny square and your tutorial is so clear and helpful. I tried several other circle in squares patterns and yours is the best! The grannies turn out beautifully whether you do multi color circles or just one colored circles. I can't wait to finish my afghan. Thank you! :)
ReplyDeleteThanks, and you're very welcome! So glad you like it, and I'd love to see your afghan when you're done!!
DeleteHappy crocheting!
Kate :}
One of the members of my Warm Up America group has made several afghans using your pattern and they are so bright and cheerful. I am a knitter who wants to learn to crochet and she suggested your tutorial. I can't wait to start! Thank you so much for sharing.
ReplyDeleteOh that's so great!! You're welcome, and if you have any questions, I will help out as much as I can! Good luck and happy crocheting!
DeleteKate :}
You do wonders with color! Seeing your creations gives me much more courage to use bright colors than I had when I first began crocheting last summer. As so many others have stated, your tutorial is EXCELLENT!
ReplyDeleteThank you so much!! That's so kind of you to say! And hooray for bright colors!!!!
DeleteHappy crocheting!
Kate :}
Yes yes yes! I just discovered your blog and finished this granny square with mercerized thread--only one color throughout, bridal white. Yours looks beautiful. So excited! Clear instruction, great pictures!
ReplyDeleteThanks for sharing!! I never thought of trying it with one color thread! I love the simplicity of that, it must look great! I'm so glad you liked the pattern!
DeleteKate :}
Thank you for the pattern! I can't wait to give it a try :)
ReplyDeleteI sure feel like the worst beginner ever! I am having a heck of a time with this pattern. I noticed my first mistake while making the rounds I didn't go in every single crochet which left me quite a few stitches short...lol! I am on my second attempt and trying to figure out the part that starts turning the circle into a square and I having a heck of a time.. not sure if I have the right amount of stitches or what! I want to pull my hair out.. but I am keeping my patience and trying this again.
ReplyDeleteI'm sorry Angela! Why don't you email me, signedwithanowl@gmail.com, and maybe I can help you from there?
DeleteKate :}
Thanks a lot for the tutorial ! I made this :
ReplyDeletehttp://tatalu.canalblog.com/
You're very welcome! They are so cute and creative!!
DeleteMerci pour le partage!
Kate :}
Thank you so much. I was looking for a different "granny square" to make an afghan for my great neice. I'm doing it in bright pink, purple and yellow (her favorite colors) It looks gorgeous. Thanks again.
ReplyDeleteYou are so welcome!! Your color combo sounds beautiful! I'd love to see it when you're done :)
DeleteHappy crocheting!
Kate :}
I would like to know can I make this in a bigger circle without the square?
ReplyDeleteThanks!
Based on a similar pattern I've used, you could try:
Deleteround 7- (3 dc, ch 1) in each ch. 1 space
round 8- (2 dc, ch 1, 2 dc, ch1) in each ch 1 space
round 9- (2 dc, ch 1) in each ch 1 space
round 10- (2 dc, ch 1) in each ch 1 space
round 11- (3 dc, ch 1) in each ch 1 space
Hope this helps!
Kate :}
Hi I just want to say how much I am loving your blog! I have just started an afghan using this pattern and 4 squares in, am loving it!
ReplyDeleteIf you don't mind me asking though, how big is the afghan in the photo at the very top of this page? It looks 4x4 squares is this right? Do you find this to be a decent size? I am wanting this blanket to be a comfortable size that's all. Thanks so much again for sharing! :)
I Kare, sorry for the late response! Yes, that afghan is 4x4, which I think is a pretty good size for a lap blanket or a baby blanket. I've also made one 6x6, which is more bed sized. You can see more pictures of that 4x4 blanket on Ravelry: http://www.ravelry.com/projects/Kate-Jenks/squaring-the-big-circle I'm bummed I forgot to write down the final measurements!
DeleteHope this helps and happy crocheting!
Kate :}
Gorgeous! Thanks for sharing the pattern!
ReplyDeleteThanks and you are very welcome!!
DeleteKate :}
Thank You so much for this tutorial! I've made 2 squares so far and look forward to many, many more. Thanks for sharing!
ReplyDeleteI love the way you have broken down each round with pictures and directions that I can follow, I have a hard time with printed instructions alone.
You are so welcome! I'm so glad you like it! I'd love to see what you make with it!!
DeleteHappy crocheting!
Kate :}
Thank you for this great photo tutorial!
ReplyDeleteYou're welcome! If you run into any problems, just let me know!
DeleteHappy crocheting!
Kate :}
I love your tutorial. This granny square is so fantastic. I will probably use it for either joining together to make prayer shawls or singly for prayer pockets. My UU church has a very worldly view and I just know everyone will love the Mandela look to this square. Like I have seen posted before the color choices are so endless. I too would also like to add my vote to making it available to print or at least in PDF format so that I don't have to be on the internet to look at it. Tanks so much for this great pattern!
ReplyDeleteTake Care,
Raven
Thank you so much Raven! Just email me at signedwithanowl@gmail.com, and I'll send you the pattern!
DeleteKate :}
Just the pattern I have been looking for. Excellent job on the instructions. Did one up in an hour. Thank you!
ReplyDeleteJoan
Thanks and you are so welcome! So glad to hear it!!
DeleteKate :}
I have work it! http://lecosedimysa.blogspot.com/2011/07/circle-in-square.html
ReplyDeleteThanks for sharing! You did a lovely job!
DeleteKate :}
Wow! So fun and easy and totally accurate to follow! Thank you- found it on ravelry while looking for new "games" to get thru yet another snow day,
ReplyDeleteThank you so much, I'm so glad you like it!!
DeleteHappy crocheting!!
Kate :}
Hi, thanks for the pattern. The pics make it supper simple, brain free to follow! I started making for a square to exchange but like it so much I'm going to keep and make my first blanket, or throw, depending on how many quares I do before I get to the point I don't want to do anymore :-) I will try sending a pic if I can. Thanks again :-)
ReplyDeleteBELLISSIMO MOTIVO LO FARO'
ReplyDeleteThank you so much!
DeleteKate :}
Thank you so much for sharing your pattern, great photos too. I am so excited I am off to find some wool. I will be sure to link back if or when I share photos, my little boy wants a blanket of his own so we set out this morning to find a pattern, and we both fell in love with this one! Thank you so much xx
ReplyDeleteThanks, you are so welcome! I'd love to see what you make and let me know if you have any trouble!
DeleteHappy hooking!!
Kate :}
Very pretty and versatile granny square! Lots of color options and even layout options if dark and light yarn is used as background. Thanks for your tutorial, very understandable!
ReplyDeleteThanks and you're welcome! I'm so glad you like it!!
DeleteHappy crocheting!!
Kate :}
Hi, I'm totally in love with this pattern - I'm making a blanket with it as we speak! (Well, type.... ;)
ReplyDeletehttp://inpursuitoftheworthwhile.blogspot.co.uk/2014/03/introducing-glastonbury-blanket.html
Thanks, I'm so glad you like it!! I LOVE the colors you are using!! Thanks so much for sharing the link!
DeleteHappy crocheting!
Kate :}
Thank you so much! Although my aunt picked most of the colours herself I'm really enjoying them, I kind of wish this blanket was going to be for me.... ;)
DeleteThank you, great pattern, I really enjoyed do this, once again thank you
ReplyDeleteYou're welcome! I'm so glad you like it!
DeleteKate :}
I have always wanted to learn how to crochet circles to squares and I love this pattern. Is there any way of printing out this pattern without having to copy and paste the pattern? I want to start on this right away.
ReplyDeleteEmail me at signedwithanowl@gmail.com and I'll send it to you!
DeleteKate :}
I've been looking for an idea to make a wedding gift and your circle square will be lovely with metallic rings! I'm looking forward to making this. Thank you! ( I'll be requesting your pattern by email)
ReplyDeleteI've finally posted about my finished blanket using this pattern - so happy with it!! Here it is, with links back to you :) Thank you so much for this fabulous pattern!!!!
ReplyDeleteDebbie x
http://inpursuitoftheworthwhile.blogspot.co.uk/2014/06/glastonbury-is-finished-wooo.html
ok, so I'm self-taught crocheter (er....learned through the internet)....what do you mean by you "start most of my rounds with a standing stitch". I don't understand that.
ReplyDeleteWhen starting another round where there are double crochets with a different color, usually you would join in the new yarn with a slip stitch and chain 3 to make the first "double crochet." Instead of doing that, (in the picture where I said "start most of my rounds with a standing stitch"), I show how you can make that first stitch just a double crochet. You join the new color of the next round by yarning over on your hook, inserting your hook in the first stitch and completing the double crochet like you normally would, leaving you with a double crochet for your first stitch. I like to use the standing stitch because I like to avoid the chain 3's that count as the first double crochet because it is more noticeable to me. If I was making something where I wasn't going to change the color for the next round, I would use the chain 3 method of course so I wouldn't have to cut the yarn to start the next round.
DeleteIf any of this is confusing, just email me (signedwithanowl@gmail.com) and I'll try to help best I can!
Kate :}
Fantastic technique. I am going to try this today. It looks so much better than the usual chains. Great simple photos to show how to do it. As they say.......a picture paints a thousand words!
DeleteGreat and thanks! If you have any trouble, just let me know!
DeleteHappy crocheting!
Kate :}
This is lovely. Could you just carry on and make this a giant granny blanket, or is it better to join smaller squares
ReplyDeleteI don't see why you couldn't continue on with the last round with the groups of 3dcs! If you do that and change colors for the different rounds, I'd suggest starting each new round in a different corner which would help keep the square in a "square" shape and avoid the twisting that sometimes happen.
DeleteHope this helps, and happy crocheting!
Kate :}
Thank you for this pattern and tutorial. With this it was easy to do. I made my granny bigger, 40 cm. and i love it.
ReplyDeleteYou're welcome Marian, so glad you liked it!!
DeleteKate :}
Great tutorial! Showing pictures is very helpful for me because I need to have a visual of how the pattern should look. Thank you!
ReplyDeleteThanks and you're welcome! I'm so glad you liked the tutorial!
DeleteHappy crafting!
Kate :}
Thank you for the great pattern. My circles start to ripple when I add the 4th round and it gets worse towards the 6th round. What can I do to correct/stop the rippling?
ReplyDeleteHmm, rippling like it's too tight or too loose? Does the rippling go away when you start the "squaring?" Have you checked your stitch count?
DeleteI might be able to help more if you can email me a photo of your square. signedwithanowl@gmail.com
Hope this helps, and with more info I hope to help more!
Kate :}
Why can't you just have a place where you put nothing but the pattern. I've been crocheting for over 50 years, and I don't believe I need a tutorial.
ReplyDeleteHi, if you would like just the written pattern, email me and I'd be happy to send it to you. I have not put just the written here as unfortunately I've had issues with people stealing my directions and trying to pass it off as their own. I want to be able to keep sharing patterns, (and some I have included just the written) so these photo tutorials help those who are just starting out, and I can send pdf's to those who would like just the written.
DeleteSo feel free to email me at signedwithanowl@gmail.com and I will do my best to help you!
Kate :}
I used this patter to make an afghan using Superman colors and it turned out great. I did not use 'join as you go' method. I am currently working on another afghan that will be a donation. It has to be completed by 03/18.I would like to use the 'join as you go method' for this one. Did you add a row (for joining) after you finished off your round 9? Thank you.
ReplyDeleteYour Superman afghan sounds great!! I did the join-as-you-go method on the 9th round, but you could also join on a 10th round too - it would be just like round 9.
DeleteBest of luck, and hope this helps! Happy crocheting!
Kate :}
Thank you for this great tutorial. It's easy to follow and looks great.
ReplyDeleteGreetings from Germany,
Kirsten
You're welcome and thanks so much!!
DeleteKate :}
I am absolutely in love with this pattern. I am currently working on an afghan using 20 of these nifty squares. I am using three different colors for mine. The center of my circles are green. That gives way to a green and purple varigated colorway for the middle and it all finishes off with a beautiful deep and dark purple. I have not posted pictures yet but I should have some up soon on my blog. I can't wait to show my readers what I have been up to with a link to your tutorial so they can do it too. Thanks for your work!
ReplyDeleteThanks so much, I'm so glad you lake the pattern! Sounds like your afghan is going to be really lovely!
DeleteHappy crocheting!
Kate :}
Great granny square!!! It's exactly what I was looking for! Thanks!
ReplyDeleteGreat, I'm so glad!
DeleteIf you have any questions, just email me!
Happy crocheting!
Kate :}
great tutorial. i tried making the pattern and it came out nice. thanx
ReplyDeleteI'm so glad, thank you!!
DeleteKate :}
Revisiting this pattern again Kate. Thank you so, so much. Gez xxo
ReplyDeletehttp://tigerscrafts.blogspot.com/2015/07/karen-jenks-inspiration.html
ReplyDeleteMy fav granny square. See pix on my blog.
ReplyDeleteDo you have a PDF version of this I don't have WiFi in my home
ReplyDelete